

|
There are 32 group masters that can each be configured to control up to 16 group members. Group masters are configured in DSP Configurator and saved in the device. Working in Emulate mode, group masters can be saved in a configuration file and pushed to the device upon connection. A group master can be either a gain control or a mute control. Group masters can be configured for bass and treble gain controls, provided that bass and treble filters have been inserted in a signal chain. You can select a single control type (for group members) that is to be controlled by a group master. For example, a group master can be configured to control only post-mixer trim levels, rather than post-mixer trim levels plus another type of GAIN block. A group member can be controlled by multiple group masters. It is recommended that this feature be used with caution, as "overlapping" membership can quickly become unmanageable (see the Multiple Group Masters subsection below). Group master gain controls can send specific values, such as those sent by a fader control. You can also set group master gain using increment and decrement controls (see the Tools subsection below). See the device user guide for information about commands for group master controls that are to be used in a control system. See the Optimizing Audio Levels section for more information. |
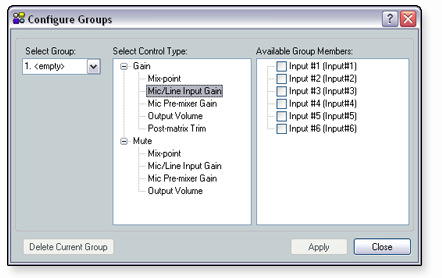
Configuring GroupsTo add and configure a group:
To modify a group:
- or - From the View menu, select Group Controls and click Add a Group in the Group Controls dialog box. The Configure Groups dialog box opens. - or - From the View menu, select Group Controls to open the Group Controls dialog box. Then, double-click one of the displayed group controls to open the Configure Group dialog box. The Configure Group dialog box opens to the selected group master, expanding the associated control type tree to show the group members.
To delete a group:
|
Viewing Group Controls
|
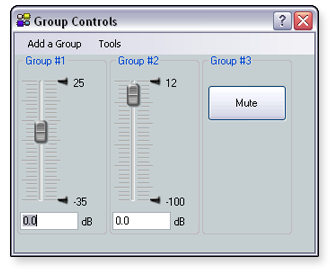
Add a GroupClicking the Add a Group option in the Group Controls dialog box opens the Configure Groups dialog box. After you add a new group and click Apply in the Configure Groups dialog box, the Group Controls window refreshes to display the added control. See the Configuring Groups subsection above for the procedure to add and configure groups. |
ToolsThe Tools
menu in the Group Controls dialog box contains four options:
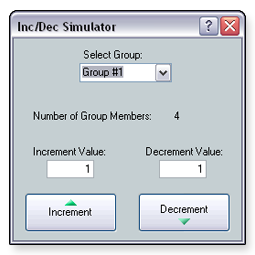
The Increment/Decrement Simulator allows you to set the increment and decrement values, providing control of increment and decrement adjustment. This control is temporary because the increment or decrement value is not stored in the device. The default value is 1. To use the Increment/Decrement Simulator:
|
![]()
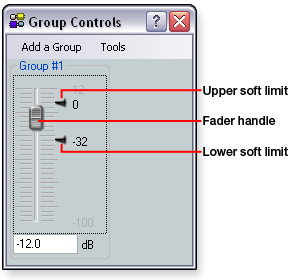
Soft LimitsEach gain control type provides upper and lower soft limits that can be used to limit the range of the group master control. When you create a group master, these soft limits default to the inherent "hard" limits of that particular control (the upper and lower limits defined by that control). Soft limits can be defined using the following methods.
To adjust the upper limit, press and hold the <Shift> key.
To adjust the lower limit, press and hold the <Ctrl> key.
|
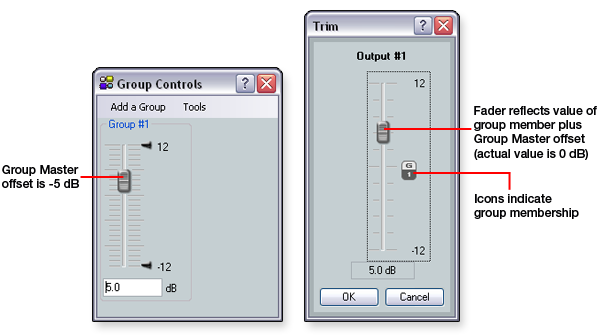
Group MembersAfter a group has been created, the group members (the individual controls that comprise the group) update to indicate that they are now part of a group. You can individually control group members. This allows for relative levels between group members to be fine-tuned. Group member levels can also be set by a preset recall. DSP Configurator displays the group member value plus the offset created by the group master. As a result, the application always displays the value that you are hearing. However, the value of the group member that is on the device is always the actual value, independent of the added group master offset value. If a group master is deleted, the group member value reverts to its actual value.
|
Multiple Group MastersA group member can be controlled by multiple group masters. It is recommended that this feature be used with caution, as "overlapping" membership can quickly become unmanageable. Multiple group masters can be useful in instances such as when Group 1 controls the volume in Room A, Group 2 controls the volume in Room B and Group 3 controls volume in a combined Room A and B.
|
![]()

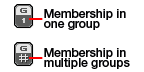 When configuring a group, group
members that are already being controlled by another group master are
indicated with blue text in the Available Group Members section of the
Configure Groups dialog box. After creating the group, the control dialog
boxes for each group member change from displaying membership in a single
group to displaying membership in multiple groups.
When configuring a group, group
members that are already being controlled by another group master are
indicated with blue text in the Available Group Members section of the
Configure Groups dialog box. After creating the group, the control dialog
boxes for each group member change from displaying membership in a single
group to displaying membership in multiple groups.