Loudness Overview

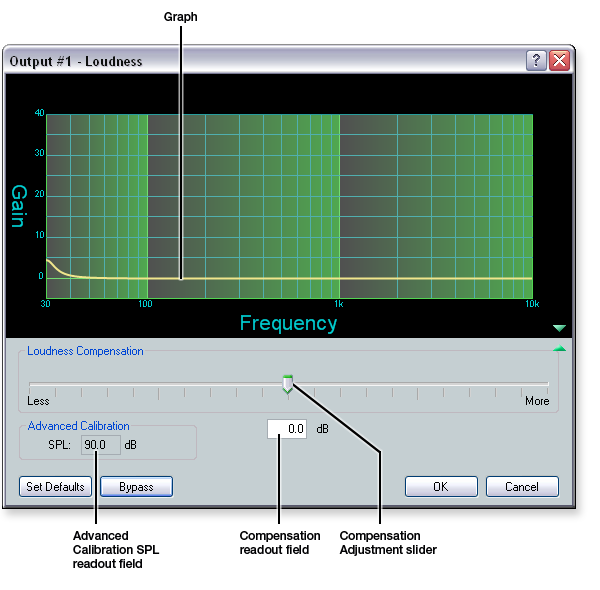
The Loudness processor applies a filter compensation curve to the signal in an inverse relationship to the output volume (the higher the output volume, the less compensation that is applied). You can fine-tune the amount of loudness compensation using the Compensation Adjustment slider and making adjustments "by ear", or by measuring SPL levels in a particular room and using the slider to adjust the loudness filter relative to the SPL (Sound Pressure Level) of the room and system gain structure.

There are two places in the signal chain where a Loudness processor can be applied: the output path or the virtual return path. On the output path, both the output volume and the post-mixer gain affect the loudness compensation curve. On the virtual path return, the pre-mixer gain affects the loudness compensation curve.

See the Loudness Calibration section for more information.

Inserting a Loudness Processor

  1. Open the context menu using one of the following methods:

  2. Double-click the LOUD (loudness) block in the DSP Configurator workspace.

  3. Right-click the LOUD block to open the context menu.

  4. Click the LOUD block to select it (or use the arrow keys to navigate to the DLY block) and press the <Enter> key on your keyboard.

  1. From the drop-down menu, select Loudness. Alternatively, if you right-clicked the block, select Insert Loudness. The LOUD block color changes to a shade of goldenrod.

To adjust the loudness settings, double-click the LOUD block. The Loudness dialog box opens. See the Loudness Dialog Box Components subsection below for information about the settings that are available in the dialog. See the Loudness Calibration section for information about calibrating the loudness that you inserted into the signal chain.

Loudness Dialog Box Components

The Loudness dialog contains the following components:

  • Graph - The graph displays the compensation curve that is being applied to the signal. These curves are read-only and are not adjustable from the graph.

  • Loudness Compensation Adjustment slider - From a center zero-point (0 dB), click and drag the slider to the left to adjust for less compensation (filter curve is reduced), or to the right for more compensation (filter curve is increased). The slider position is translated into a dB value that is displayed in the compensation readout field (see image below).

    When less compensation is applied (the slider is moved to the left), it compensates for more perceived loudness, therefore the dB value increases as less compensation is applied. The opposite is true for adding more compensation. With the center point being 0 dB, the slider range is from +24 dB (full left) to
    -24 dB (full right).

  • Advanced Calibration - The Advanced Calibration section of the Loudness dialog contains an SPL readout field (see image below) that provides the summed value of the Loudness Compensation Adjustment slider, the post gain setting, and the output channel volume control, with a +90 dB offset that corresponds to the average loudest listening level. For example, the SPL readout value is 90 dB when the loudness compensation adjustment is 0 dB, the post gain is set to
    0 dB, and the output volume is 100 percent (0 dB).