
The MPX Plus 866 A can store up to 32 presets. Presets that are saved via DSP Configurator are partial presets, which can include all gain, processor, switcher matrix, and mic-mixer settings. Alternatively, partial presets can include a portion of those elements (any combination of user-selected elements). When recalled, a partial preset overwrites only the elements contained in the preset. Partial presets are useful when you want to adjust only the settings for a particular room or only certain elements of a configuration. Presets that are saved using DSP Configurator can be recalled via DSP Configurator or a control system sending an SIS™ Recall Preset command.
For the MPX Plus 866 A, presets 1 through 26 can be recalled via the Front Panel Control (FPC). Presets can also be saved using the front panel, however, presets that are saved in this manner are global tie presets. A global tie preset contains only the switcher matrix settings (ties), and will overwrite all of the switcher matrix settings when recalled. The Matrix Switcher Control Program and the standard SIS Save Preset command only work with DSP Configurator.
The normal workflow for the MPX Plus 866 A is to create a configuration and a set of presets in Emulate mode, save the file, then push the file to the device when connected in Live mode (see the Emulate Mode Versus Live Mode section). When performing a Pull Data synchronization, preset data remains on the device and only the list of preset names is pulled from the device. Presets in this state are marked with an asterisk (*) until you recall the presets (which pulls the preset data from the device), or until you perform a backup (see the Backup section).
Presets that are pulled from the device cannot be saved to disk until they have been recalled, at which time the preset data is pulled into DSP Configurator. Presets that are pushed to the device or created in DSP Configurator in Live mode have no asterisk. Presets with no asterisks can be saved to disk.
See the Switcher Matrix Operation section for the procedure to make matrix ties.
To select all ties:
From the Tools menu, locate the Presets submenu and select Mark All Ties. Alternatively, press
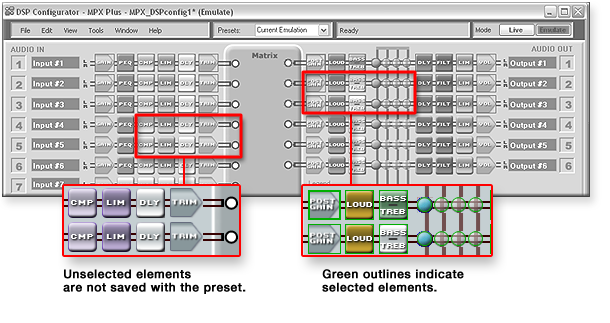
<Ctrl + A> on the keyboard. All of the matrix ties in the workspace are outline in green, indicating that they are selected.
The Mark All Items option selects all of the elements in DSP Configurator to save a full preset. See the "Save Preset" subsection below for more information about saving presets.
To select all elements:
From the Tools menu, locate the Presets submenu and select Mark All Items. Alternatively, press <Ctrl + A + A> on the keyboard. All items in the workspace are outlined in green, indicating that they are selected.
NOTE: The Save option on the Presets submenu is enabled after you begin selecting elements in the workspace to save as a preset.
You can save a preset in either Emulate mode or Live mode. Saving a preset in Emulate mode stores the preset in the file that is currently open. This file must then be saved to disk (recommended), pushed to the device after a connection is established, or both. In Live mode, the preset is saved directly to the device.
First, create a configuration from which you want to save a preset. In Emulate mode, you are working from the current emulation. In Live mode, you are working from the current state of the device. To build a preset, you must first select the elements to be saved.
To select elements in DSP Configurator that are to be saved as a preset, use one of the following methods:
To save a preset:
From the Tools menu, locate the Presets submenu and select Save Preset. A dialog box opens, informing you that only the highlighted elements will be saved in the preset.
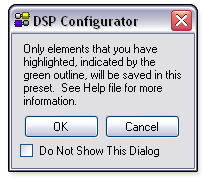
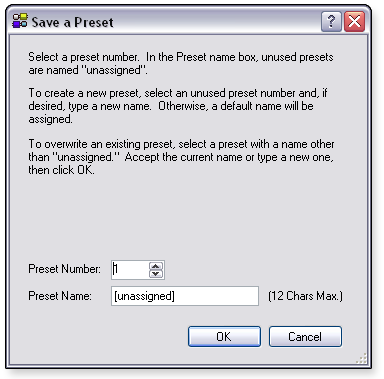
In the dialog box, click OK to proceed. The Save a Preset dialog box opens.
NOTE: The workspace may differ from the one shown in the above image depending on the device you are working with (such as the MPX Plus 866 A). See the Workspaces Overview section for details about the DSP Configurator workspaces.
This option clears all of the elements that are selected in the workspace.
NOTE: The Clear Marked Items option on the Presets submenu is enabled after you begin selecting elements in the workspace to save as a preset.
To clear the selected elements:
From the Tools menu, locate the Presets submenu and select Clear Marked Items. Alternatively, click in an area of the workspace not containing the processor elements.
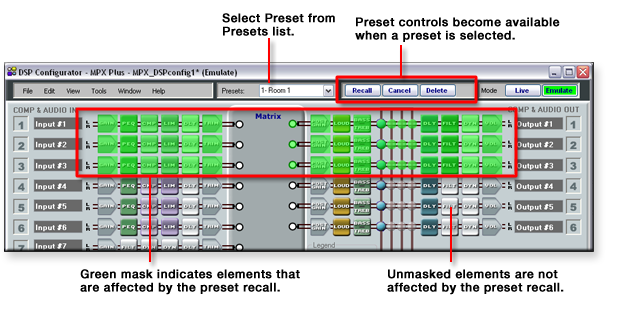
You can preview a preset in Emulate mode or Live mode by selecting a preset from the Presets drop-down list on the DSP Configurator menu bar. In Live mode, DSP Configurator reads the preset selections from the device. In Emulate mode, the application accesses the presets contained in the current configuration file. In this preview state, you cannot make any changes to an element in DSP Configurator. In Live mode, real-time changes to the current state are not reflected in DSP Configurator while in this preview state.
After you select a preset from the Presets drop-down list, the application indicates that you are viewing a preset configuration by displaying the preset elements (those which will be affected by a preset recall) with a green translucent mask layer in the workspace. Elements without a translucent mask represent the elements in the current state (Live mode) or current emulation (Emulate mode) that will be unaffected by a preset recall.
NOTE: The workspace may differ from the one shown in the above image depending on the device you are working with (such as the MPX Plus 866 A). See the Workspaces Overview section for details about the DSP Configurator workspaces.
To preview and recall a preset:
